~ from my home to yours ... ~
I love our little home, it's perfect for us! There's warmth and love within its walls and yes, mason jars, home preserved foods, herbs, books, WIP projects, lots of snuggly quilts, a swing on the front porch and a rocking chair nearby! We call it home and we call ourselves blessed. We give God the glory for He has had and continues to have His hand in it all!
Showing posts with label Recipes. Show all posts

Sunday, February 25, 2024

Use it Up Food Challenge: 2/25/24

 What is a 'Use It Up Food' challenge?

 It's about food waste or more specifically not wasting food ...

 It's about repurposing our leftovers into another dish,

 It's about using every part of fruits and vegetables,

 It's about using up the really small amounts of food ...

It's about using up food scraps, peels and stems ...

It's about being mindful of every bit of food that comes in and through our kitchens and finding a use for it ... all of it!

That's our purpose for this series, so, how did we do this week?

I had some leftover steak in the refrigerator that I needed to use.  It wasn't enough for steak for two, so I turned it into a stir-fry dish ...


I started out with a large skillet and a little oil.  (I used cooking oil, but you can use bacon grease, garlic oil, any kind of fat that you think will go with the stir fry.)

I sliced up some onion and chopped up some carrots I had on hand and sauté them in the skillet over medium heat.


Then I added a cabbage from our garden that I chopped up and continuing sautéing right along with the onions and carrots.


Next, came the sliced up steak, fat and all.  I didn't add any seasoning to the skillet other than salt and pepper for the vegetables because the steak was already seasoned just right for our taste.


Since the steak was already cooked, all it had to do was sauté along with the vegetables until everything was done and the steak heated through and through.

Oh my goodness, it was lip smacking good!  Stir fry is typically served over rice, but this was eaten as you see it!  Yum!  Yum!

I was able to take what wasn't enough for one meal and turn it into 2 meals using leftovers and what I had on hand!

Score!!!

What leftover, bits and bobs, etc of food did you use up this week?

until next time,

mrs. patsi @ A Working Pantry

She looketh well to the ways of her household … Proverbs 31:27 

Sharing 44 years' experience of frugal, prudent living and pantry building 

 Instagram link!

My second blog:  From This Heart of Mine, where I share my love for God and His Word through my personal Bibe study.  Physical preparedness is important, but not near as important as spiritual preparedness.  Ladies, join me over at From This Heart of Mine and study God's Word with me.

You can view my privacy policy HERE.

Thank you for using my Amazon affiliate link when placing your Amazon orders. I earn a small percentage that doesn't increase what you pay, and it helps me keep my pantry well-stocked! 

Disclaimer: Some of the links in this post may be affiliate links.  This means that if you click on the link and place an order, etc I earn a small fee at no increased cost to you. Thank you for your support through these means.

Saturday, January 6, 2024

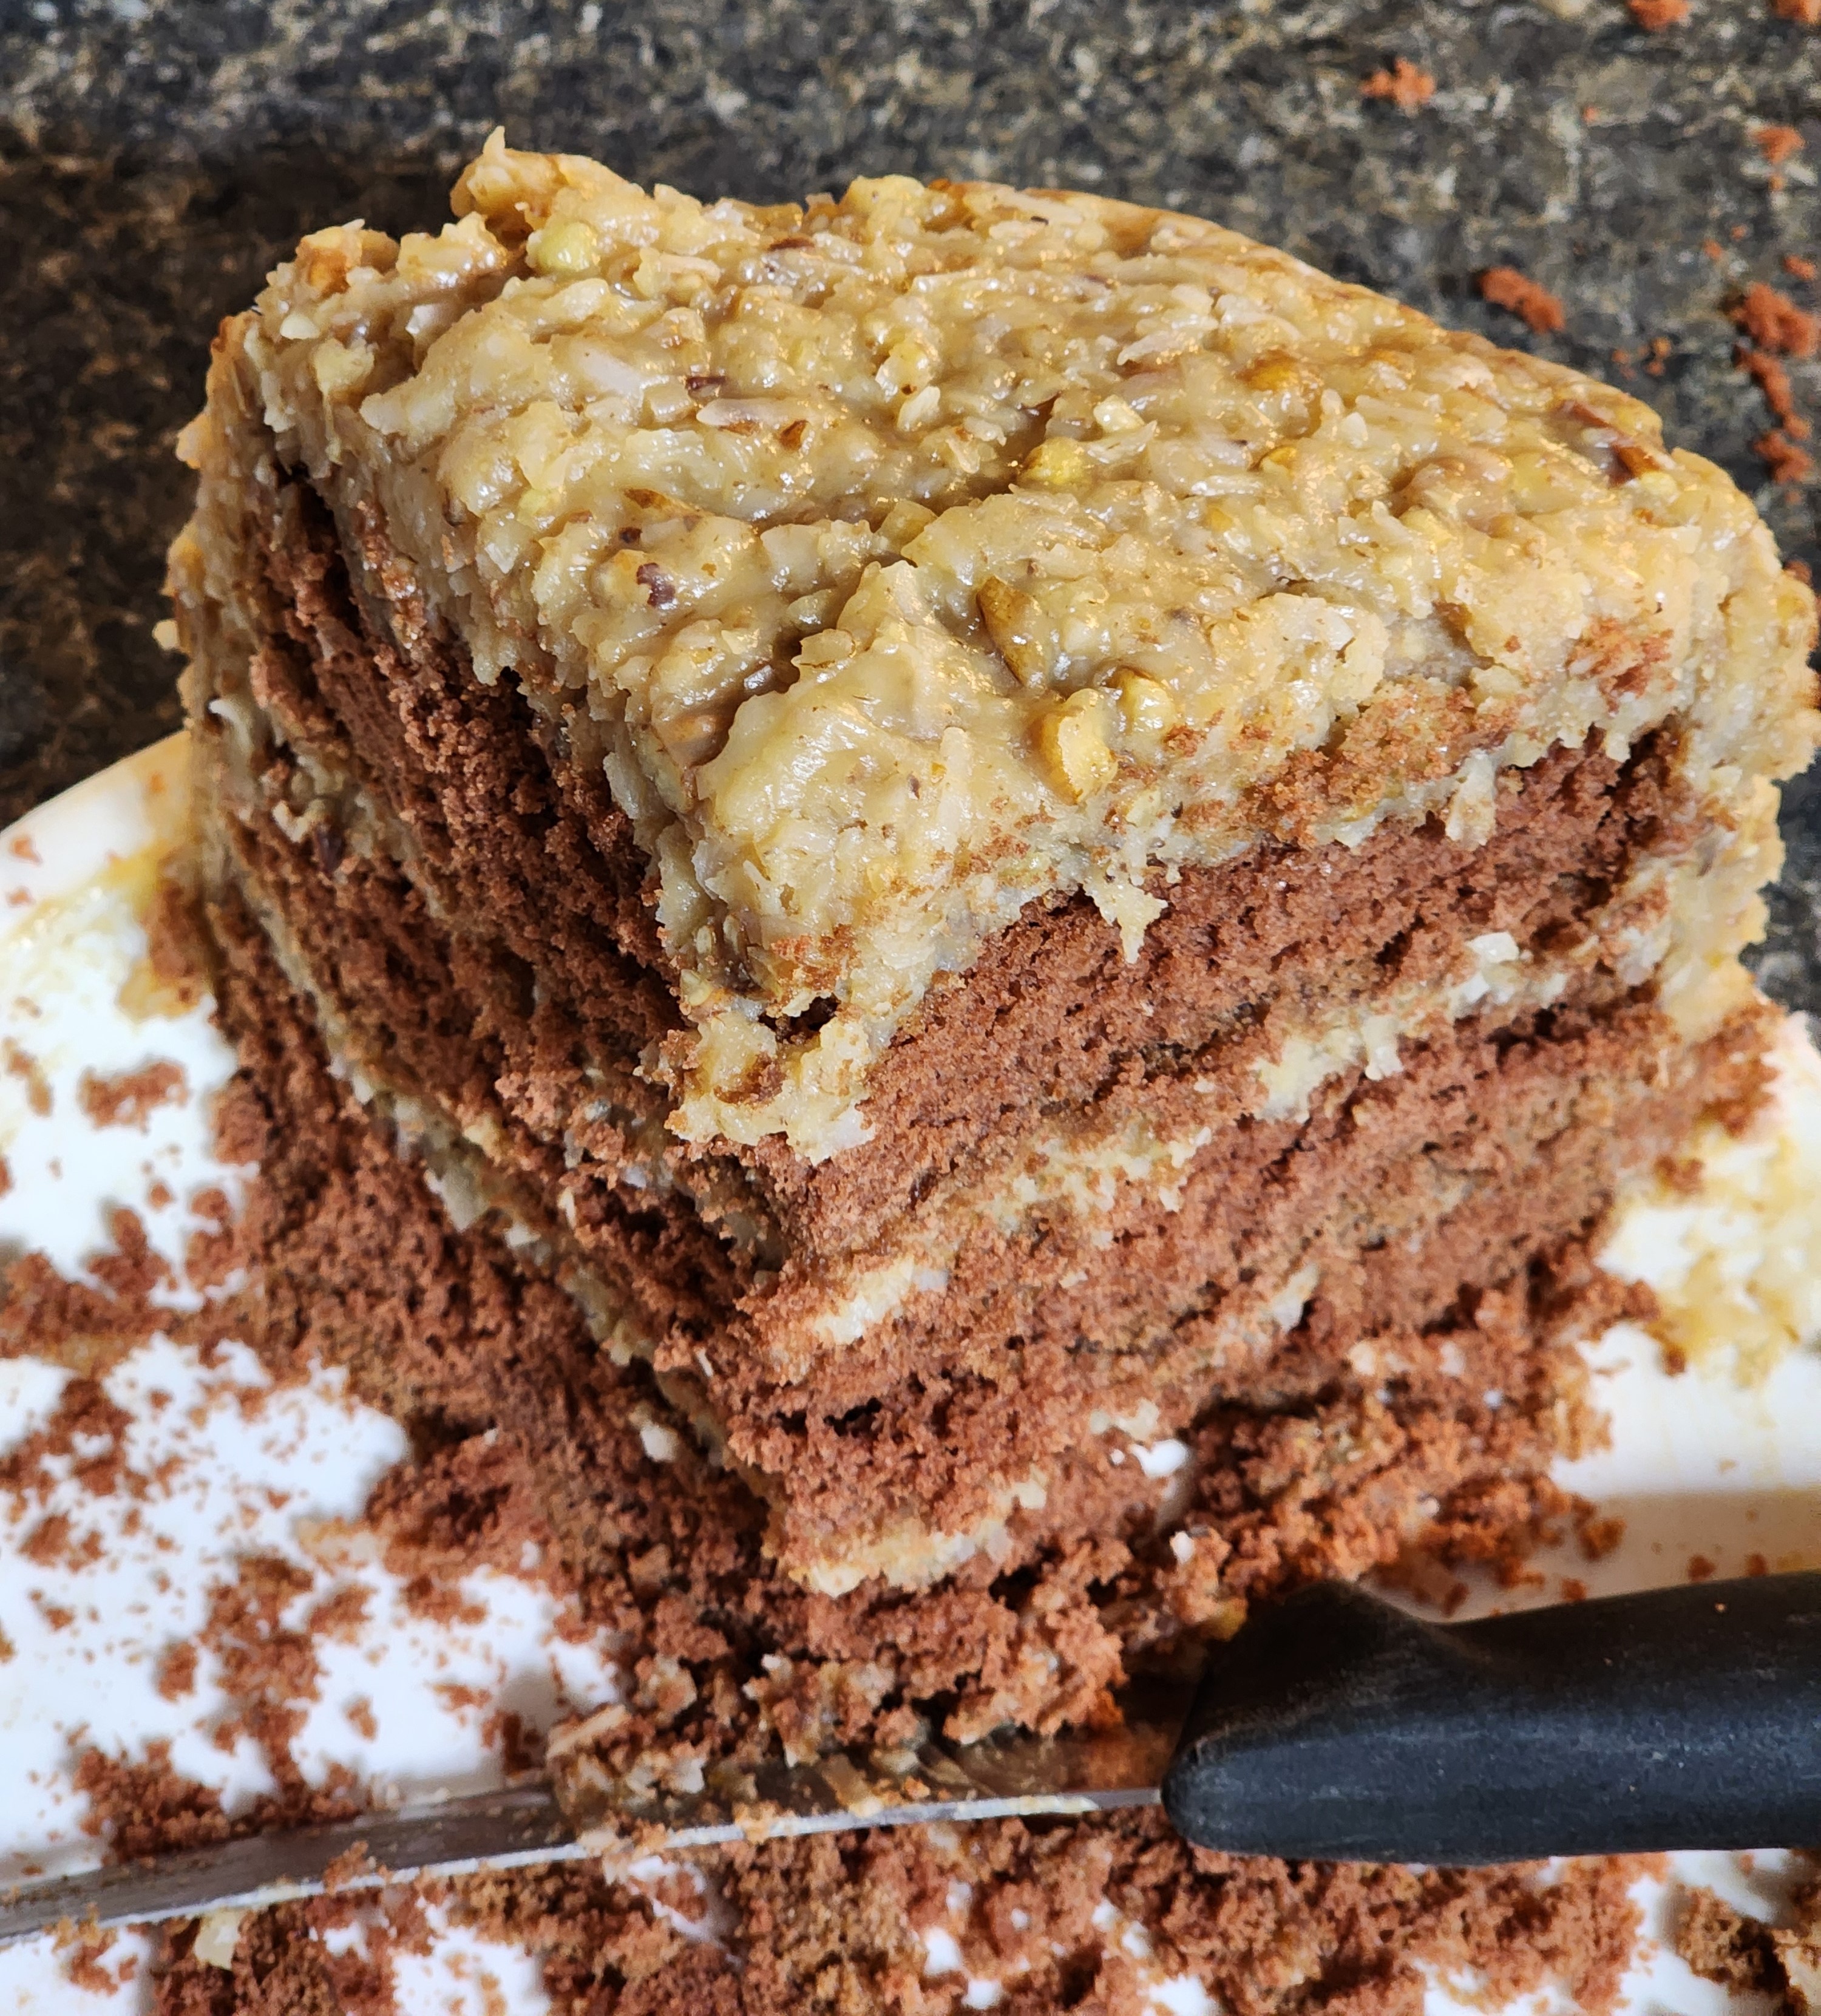
German Chocolate Cake: Made From Scratch

Someone asked me for the recipe for the German Chocolate cake we make from scratch after seeing this picture ...


I thought I had already shared the recipe, but couldn't find it so, here you go ...

This recipe came from my mother-in-law, who is no longer with us.  She served it in her home for as long as I knew her.  It became and continues to be a tradition for our family during the holidays and it has even been requested for a birthday celebration every now and then.

German Chocolate Cake

2 1/4 cups all-purpose flour (we use cake flour)
2 cups sugar
1 cup buttermilk
1 teaspoon soda
1 cup Crisco
1 pkg German Chocolate melted in 1/2 cup boiling water
4 egg yolks
4 egg whites
1 teaspoon vanilla

Beat egg whites and set aside
Blend Crisco, sugar, flour, yolks and 3/4 cup of buttermilk
Mix soda with remaining buttermilk and add to above mixture
Add vanilla and chocolate
Fold in egg whites

Bake at 350 degrees for 35 - 40 minutes

Enough for 3 layers
(These layers can be made ahead and frozen!)

Frosting

(we double this recipe)

1 cup evaporated milk
1 stick butter
3 egg yolks
1 cup sugar
1 cup coconut
1 cup nuts, chopped

Mix all ingredients except coconut and nuts in a saucepan and cook until thick over medium heat, stirring constantly.  
Note: this sticks easily so don't take the stirring constantly lightly!

Let mixture cool then add coconut and nuts

Spread between layers, on top and sides

Enjoy!

until next time,

mrs. patsi @ A Working Pantry

She looketh well to the ways of her household … Proverbs 31:27 

Sharing 44 years' experience of frugal, prudent living and pantry building 

My second blog:  From This Heart of Mine, where I share my love for God and His Word through my personal Bibe study.  Physical preparedness is important, but not near as important as spiritual preparedness.  Ladies, join me over at From This Heart of Mine and study God's Word with me.

You can view my privacy policy HERE.

Thank you for using my Amazon affiliate link when placing your Amazon orders. I earn a small percentage that doesn't increase what you pay, and it helps me keep my pantry well-stocked! 

Disclaimer: Some of the links in this post may be affiliate links.  This means that if you click on the link and place an order, etc I earn a small fee at no increased cost to you. Thank you for your support through these means.

Friday, October 27, 2023

Lunch from the Refrigerator!

It was lunch time on a day in which I was battling an allergy issue and I wanted something warm/hot that wouldn't require a lot of effort.  So, I took myself over to the refrigerator, opened the door and had a look inside to see what my options were.

As I surveyed the possibilities, I knew what I would have ...

I laid the ingredients out on the counter ...

Put a skillet on the stove top, sprayed it down with coconut oil cooking spray and turned the eye on medium heat ...


Placed a low carb tortilla in the skillet ...


Added two slices of provolone cheese ....


As soon as I could see the cheese starting to soften and melt, I added thin slices of deli ham ...


After a minute or so, I did a fold over ...


After another minute or so, I flipped it and turned off the stove ...

I placed my hot and gooey sandwich on a plate and cut it in half.

It was quite delicious and hit the spot!

(If you are a calorie counter, as I am, this came to approximately 325 calories.)

Until next time,

patsi @ A Working Pantry

She looketh well to the ways of her household … Proverbs 31:27 

Sharing 43 years' experience of frugal, prudent living and pantry building 

My second blog:  From This Heart of Mine, where I share my love for God and His Word through my personal Bibe study.  Physical preparedness is important, but not near as important as spiritual preparedness.  Ladies, join me over at From This Heart of Mine and study God's Word with me.

You can view my privacy policy HERE.

Thank you for using my Amazon affiliate link when placing your Amazon orders. I earn a small percentage that doesn't increase what you pay, and it helps me keep my pantry well-stocked! 

Disclaimer: Some of the links in this post may be affiliate links.  This means that if you click on the link and place an order, etc I earn a small fee at no increased cost to you. Thank you for your support through these means.

Saturday, July 15, 2023

Zucchini Walnut Brownies

I needed a desert to take to someone and I had some zucchini that needed using so I made ...

Zucchini Walnut Brownies

Beat together in a bowl ...

4 eggs

1 1/2 cups oil

2 cups sugar

Sift together ...

2 cups all-purpose flour

2 teaspoons soda

2 teaspoons cinnamon

1 teaspoon salt 

4 tablespoons cocoa

Add dry ingredients to wet ingredients and mix well.

Add to mixture ...

1 teaspoon vanilla

3 cups shredded zucchini

Fold in ...

1 cup walnut halves

Bake at 350 degrees for 30 minutes in a 9 x 13 baking dish

I taste tested the edges ... YUM!

Until next time,

patsi @ A Working Pantry

She looketh well to the ways of her household … Proverbs 31:27 

Sharing 43 years' experience of frugal, prudent living and pantry building 

My second blog:  From This Heart of Mine, where I share my love for God and His Word through my personal Bibe study.  Physical preparedness is important, but not near as important as spiritual preparedness.  Join me over at From This Heart of Mine and study God's Word with me.

Items I use in keeping my pantry well-stocked:

Dehydrator

Dehydrator Teflon Sheets

Dehydrator Cookbook

Food Saver Vacuum Sealer

Herb/Coffee Bean Grinder

Manual Food Chopper

Pressure Canner

Canning Supplies

Food Scale

You can view my privacy policy HERE.

Thank you for using my Amazon affiliate link when placing your Amazon orders. I earn a small percentage that doesn't increase what you pay, and it helps me keep my pantry well-stocked! 

Disclaimer: Some of the links in this post may be affiliate links.  This means that if you click on the link and place an order, etc I earn a small fee at no increased cost to you. Thank you for your support through these means.


Monday, July 10, 2023

Chunky Applesauce Cobbler

Chunky Applesauce Cobbler

Preheat oven to 350 degrees

In a 9 x 13-inch pan melt 1 stick of butter in oven (I used an aluminum pan since I was preparing this desert for someone else.)

While butter is melting mix in a separate bowl:

1 cup - Self Rising Flour

1 cup - Sugar

1 cup - Milk

After butter is melted pour the dough mixture on top of the butter - do not mix or stir into butter

Spoon 3 cups of applesauce over mixture - again do not stir or mix in any way with other ingredients (I used home-canned chunky applesauce)

Sprinkle cinnamon over top and bake for approximately 30 minutes or until done.

The cobbler smelled delicious as it cooked.  Hubby and I decided that we would definitely make one for ourselves at a future date, as this one was made for someone else, and enjoy it with a scoop of ice cream on top!

Until next time,

patsi @ A Working Pantry

She looketh well to the ways of her household … Proverbs 31:27 

Sharing 43 years' experience of frugal, prudent living and pantry building 

My second blog:  From This Heart of Mine, where I share my love for God and His Word through my personal Bibe study.  Physical preparedness is important, but not near as important as spiritual preparedness.  Join me over at From This Heart of Mine and study God's Word with me.

Items I use in keeping my pantry well-stocked:

Dehydrator

Dehydrator Teflon Sheets

Dehydrator Cookbook

Food Saver Vacuum Sealer

Herb/Coffee Bean Grinder

Manual Food Chopper

Pressure Canner

Canning Supplies

Food Scale

You can view my privacy policy HERE.

Thank you for using my Amazon affiliate link when placing your Amazon orders. I earn a small percentage that doesn't increase what you pay, and it helps me keep my pantry well-stocked! 

Disclaimer: Some of the links in this post may be affiliate links.  This means that if you click on the link and place an order, etc I earn a small fee at no increased cost to you. Thank you for your support through these means.

Monday, May 22, 2023

In the Kitchen: This Cake is Delicious!

I don't know where I got the recipe for this cake, but I'm glad I found it!  Both hubby and I enjoyed a slice of it before we packaged up the rest to share with another family.  Here's the recipe along with the changes I made to it:

Olivia Waltons Applesauce Cake
1 cup butter
1 cup sugar
2 eggs
3 1/2 cups all-purpose flour (I used cake flour)
2 t. Ground cloves
1 t. nutmeg
1 t. cinnamon
1 t. baking soda
pinch salt
2 cups raisins (soaked in water for 30 minutes to soften)
1 cup walnuts  (substituted home-canned pecans)
2 cups applesauce  (I used home-canned applesauce)

Additional change I made:  Instead of using the ground cloves, nutmeg and cinnamon, I used 4 teaspoons of apple pie spice mix.

Bake for 50 minutes at 350 degrees  (I needed to cook it for 75 minutes in my oven instead of the called for 50 minutes)

Frosting   (I did not make the frosting nor add any other frosting)
1/4 cup butter
1 T. heavy cream
2 cups Confectioners sugar
2 T. bourbon or Vanilla

The cake was delicious!

Until next time,
She looketh well to the ways of her household … Proverbs 31:27 

Sharing 43 years' experience of frugal, prudent living and pantry building 

My second blog:  From This Heart of Mine, where I share my love for God and His Word through my personal Bibe study.  Physical preparedness is important, but not near as important as spiritual preparedness.  Join me over at From This Heart of Mine and study God's Word with me.

You can view my privacy policy HERE.

Thank you for using my Amazon affiliate link when placing your Amazon orders. I earn a small percentage that doesn't increase what you pay, and it helps me keep my pantry well-stocked! 

Disclaimer: Some of the links in this post may be affiliate links.  This means that if you click on the link and place an order, etc I earn a small fee at no increased cost to you. Thank you for your support through these means.

Monday, April 10, 2023

Making Fried Pies the Easy Way!: 4/10/23

When I canned up jar after jar of apple pie filling a couple of years ago, I knew that at some point I would try using it as filling for fried pies.  Today I did that, but opening a jar of apple pie filling instead of making it from scratch wasn't the only short cut I utilized.  I also pulled store bought rolls of pie crust from the freezer and after they thawed set to work.

I unrolled the pie crusts and laid them out flat.  Once that was done, I placed a saucer upside down on the dough and cut out circles using the saucer as my template.  I got 2 circles out of each pie crust.

Once I had the circles cut out, I opened up a jar of apple pie filling and spooned a couple of heaping tablespoons on each circle towards one side.  

I then folded the dough over and used a wet fork to seal the edges.

I deep fried them in peanut oil for about 5 minutes turning once and the rest is history!  Both hubby and I are very pleased with the taste of the end product, and they couldn't have been easier to make!

Until next time ...

Sharing 42 years' experience of frugal, prudent living and pantry building 

My second blog:  From This Heart of Mine, where I share my love for God and His Word through my personal Bibe study.  Physical preparedness is important, but not near as important as spiritual preparedness.  Join me over at From This Heart of Mine and study God's Word with me.

She looketh well to the ways of her household … Proverbs 31:27 

You can view my privacy policy HERE.

Saturday, March 18, 2023

Using Home-canned Apple Pie Filling

I needed a desert to take to someone, so I went to my pantry and pulled out apple pie filling ... home-canned apple pie filling to be exact.

Here's what I did with it ...

I dumped the apple pie filling into a disposable pan and then mixed the following for the topping ...

1/2 cup all-purpose flour

1 cup old fashioned rolled oats

3/4 cup brown sugar

1 1/4 tsp apple pie spice seasoning

1/4 tsp salt

1/2 cup cold cubed butter

I spread the topping over the apple pie filling and baked uncovered in the oven for 30 minutes @ 400 degrees until it started bubbling and the top was golden brown around the edges.

Let me warn you about the smell that will permeate your house, all I can say is it was a good thing this desert was for someone else!  Both my husband and I kept commenting on how good it smelt!

This is such an easy way to make a delicious desert!  It's a real good reason to keep apple pie filling in your pantry too!

One more thing, I added a post over on my other blog, From This Heart of Mine, on Psalm 119:18, I hope it encourages you in your spiritual walk.

Until tomorrow ...

Sharing 42 years' experience of frugal, prudent living and pantry building 

My second blog:  From This Heart of Mine, where I share my love for God and His Word through my personal Bibe study.  Physical preparedness is important, but not near as important as spiritual preparedness.  Join me over at From This Heart of Mine and study God's Word with me.

She looketh well to the ways of her household … Proverbs 31:27 

You can view my privacy policy HERE

Sunday, January 8, 2023

Okra Soup

I've been asked for this recipe several times and I thought I had already shared it, but couldn't find it when I did a search, so here it is ...

I had never heard of okra soup until I met and married my husband.  As a child he spent several years in Africa as his parents were missionaries there and he grew to love several of their dishes, okra soup was one of them.

Here's the recipe/method ...

1 lb browned ground beef with chopped onions

1 - 2 quarts of canned tomatoes

1 quart of chopped, sauteed okra

Cayenne pepper pods to taste

Tomato paste to thicken if you like a thicker soup (optional) Use the amount that gives you the desired thickness

(If you don't have canned tomatoes, you can use tomato paste and water to make the liquid for the soup.  I think it's 3 cans of water to one can of tomato paste.  You can also use tomato juice and tomato paste.)

Mix all together, bring to a boil and let simmer for at least an hour. 

Serve over a bed of cooked rice or serve it as a bowl of soup without rice.  Either way it's good!

Enjoy!

Here are a couple more 'okra' post from the archives ...

Can You Fry Rehydrated Okra After it has Been Dried

and

How I Boil Okra

And finally, I want to encourage you to go over and check out this young woman's blog, Spring Creek Cottage.  She took a sabbatical from blogging for a while, but now she's back. If you enjoy the kind of things you read here, you will enjoy her blog.

Until tomorrow,

Patsi 

Sharing 42 years' experience of frugal, prudent living and pantry building 

A Working Pantry

My second blog:  From This Heart of Mine 

She looketh well to the ways of her household … Proverbs 31:27 

You can view my privacy policy HERE